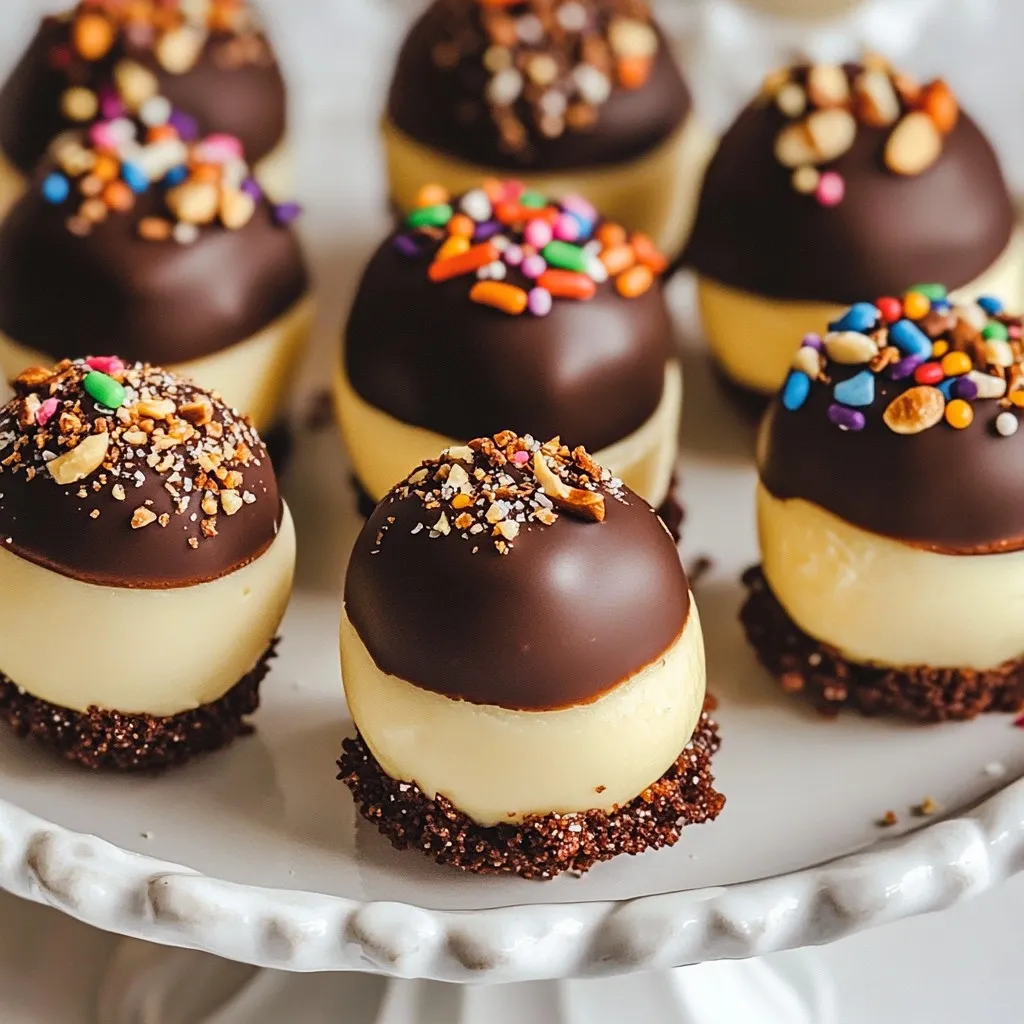
If you love cheesecake and chocolate, you are in for a treat! My Chocolate Covered Cheesecake Bites are easy to make and incredibly delicious. With just a few simple ingredients, you can whip up these bite-sized delights that are perfect for any occasion. Whether you’re hosting a party or just craving something sweet, these bites will impress everyone. Let’s dive into the recipe and make some magic happen!
Why I Love This Recipe
- Decadent Flavor: The rich combination of cream cheese and dark chocolate creates a luxurious taste that is irresistible.
- Easy to Make: This recipe is simple and requires minimal ingredients, making it perfect for novice bakers.
- Perfect for Parties: These bites are bite-sized, making them an ideal treat for gatherings and celebrations.
- Customizable: You can add your favorite toppings, like sprinkles or nuts, to make them uniquely yours.
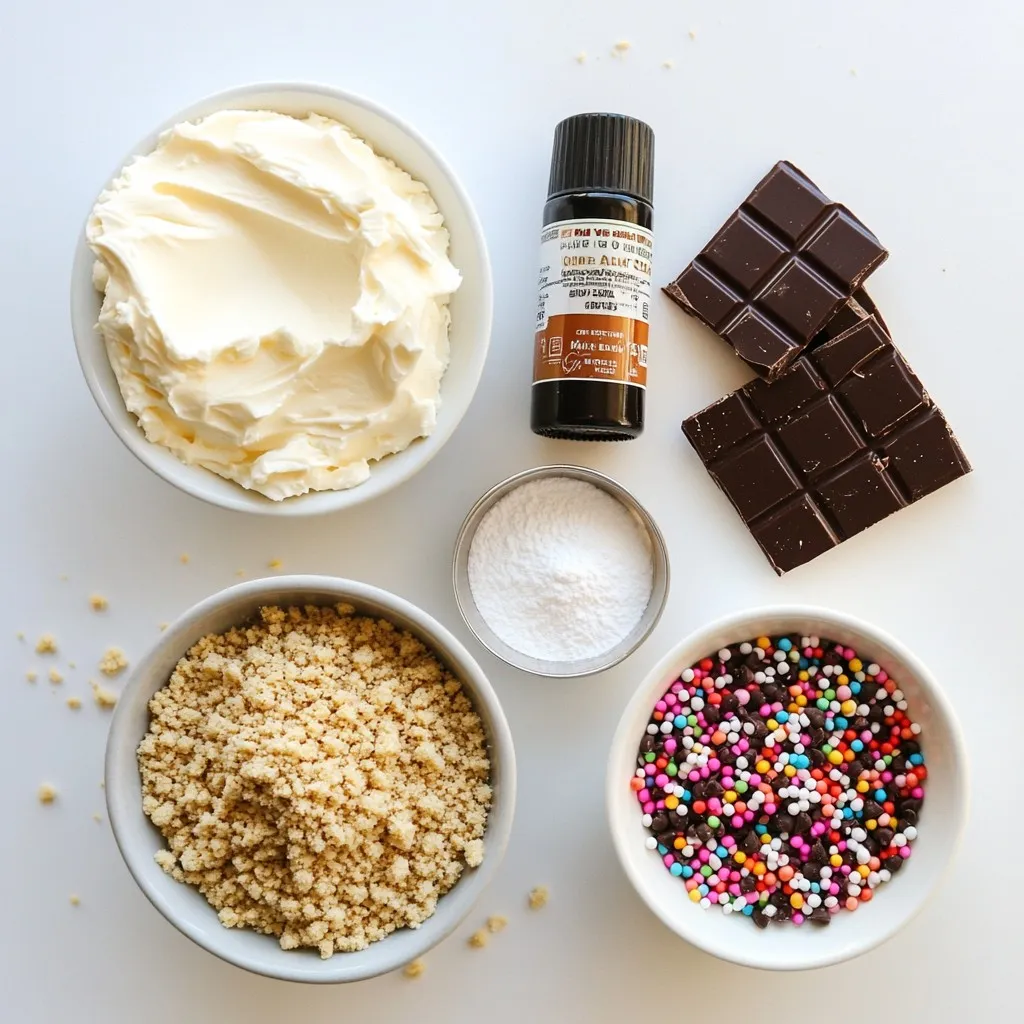
Ingredients
To make Chocolate Covered Cheesecake Bites, gather these simple ingredients:
– 8 oz cream cheese, softened
– 1/2 cup powdered sugar
– 1 teaspoon vanilla extract
– 1 cup graham cracker crumbs
– 1/2 cup mini chocolate chips
– 8 oz dark chocolate (for coating)
– Optional garnishes: Sprinkles or crushed nuts
Each ingredient has a role. The cream cheese gives a rich, creamy base. The powdered sugar adds sweetness, while vanilla brings a lovely aroma. Graham cracker crumbs create a nice texture, and mini chocolate chips add little bursts of chocolate. The dark chocolate coating ties it all together, giving a smooth finish.
Feel free to get creative with garnishes! Sprinkles add color and fun, while crushed nuts give a delightful crunch. Choose what you like best.
Step-by-Step Instructions
Mixing the Cheesecake Base
– Combine 8 oz of softened cream cheese, 1/2 cup of powdered sugar, and 1 teaspoon of vanilla extract.
– Beat these ingredients with a hand mixer until smooth and creamy.
Incorporating Additional Ingredients
– Gently fold in 1 cup of graham cracker crumbs and 1/2 cup of mini chocolate chips. Make sure everything is mixed well.
Forming and Freezing Bites
– Use a small cookie scoop or your hands to shape the mixture into bite-sized balls.
– Place these balls on a baking sheet lined with parchment paper, then freeze for 30 minutes.
Melting the Chocolate
– In a microwave-safe bowl, melt 8 oz of dark chocolate.
– Heat in 30-second intervals, stirring between each until smooth.
Coating the Bites
– Dip each frozen bite into the melted chocolate. Make sure they get fully coated.
– Lift them out with a fork and let any extra chocolate drip off.
– Place the bites back on parchment paper.
Setting the Chocolate
– Refrigerate the bites for about 15 minutes or until the chocolate hardens.
Tips & Tricks
Achieving the Perfect Texture
Softened cream cheese is key for smooth cheesecake bites. It blends easily with sugar and vanilla. Make sure to leave it out for at least 30 minutes before using. This step helps create a creamy base.
For the chocolate coating, melt it slowly. Use a microwave-safe bowl. Heat the chocolate in 30-second bursts. Stir in between to avoid burning. This gives you a smooth and shiny finish for your bites.
Presentation Ideas
Garnish the bites to make them pop! Use colorful sprinkles or crushed nuts for a fun touch. These add texture and visual appeal. For a classy look, arrange the bites on a decorative platter. They are perfect for parties or gatherings.
You can also serve them with fresh fruit. Strawberries or raspberries pair well with chocolate. This adds freshness and balance to the rich cheesecake.
Troubleshooting Common Issues
If your chocolate is too thick, add a small amount of vegetable oil. Stir until smooth. This helps the chocolate coat nicely.
To prevent cracks in the chocolate coating, ensure the cheesecake bites are fully frozen. This helps the chocolate set evenly and prevents it from cracking. Enjoy your perfect chocolate-covered cheesecake bites!
Pro Tips
- Chill Your Ingredients: Make sure your cream cheese is softened but not too warm. This helps achieve the perfect creamy texture without overmixing.
- Melting Chocolate: When melting chocolate, use a microwave-safe bowl and heat it in short intervals. Stir frequently to prevent burning and ensure a smooth coating.
- Keep It Cool: If the cheesecake mixture is too soft to work with, chill it in the fridge for a short while before forming the balls. This will help them hold their shape better.
- Decorative Touch: Experiment with different toppings like crushed cookies, coconut flakes, or edible glitter to make your cheesecake bites visually appealing.
Variations
Flavor Variations
You can get creative with flavors in your cheesecake bites. Try adding different extracts like almond or lemon. These can give your bites a fresh twist. You can also use flavored cream cheeses. Think about options like strawberry or pumpkin spice. These little changes can make a big difference in taste.
Alternative Coatings
When it comes to coating your cheesecake bites, you have options. You can choose between white chocolate and dark chocolate. Each adds a unique flavor. If you want fun colors, use candy melts. They come in many shades and can brighten up your bites.
Healthier Alternatives
You can make these cheesecake bites a bit healthier too. Use low-fat cream cheese if you want to cut calories. This swaps out some fat but keeps the taste. For the chocolate coating, consider sugar-free options. They work well and taste great, letting you enjoy your treats guilt-free.
Storage Info
Storing Leftover Bites
Store leftover bites in the fridge. Use an airtight container to keep them fresh. Place parchment paper between layers to prevent sticking. This way, they stay nice and neat. If you want to keep them longer, freeze them. Just put the bites in a freezer-safe bag. Make sure to squeeze out the air before sealing.
Shelf Life
These bites last up to a week in the fridge. Keep an eye on them for any signs of spoilage. To maintain freshness, avoid leaving them out at room temperature for too long. Always return them to the fridge after serving.
Reheating Suggestions
If your bites become too firm, don’t worry. Just let them sit at room temperature for a few minutes. This will soften them up. You can also place them in the microwave for a few seconds. Be careful not to overheat. Enjoy your bites at the perfect texture!
FAQs
Can I use other types of chocolate?
Yes, you can use white, milk, or dark chocolate. Each type gives a unique taste. White chocolate adds sweetness. Milk chocolate is creamy and smooth. Dark chocolate offers a deeper flavor. Feel free to mix and match. You can even swirl them for a fun look!
How do I prevent the chocolate from cracking?
To avoid cracks, ensure chocolate is smooth and warm. Dip bites quickly to reduce time in the chocolate. If the chocolate cools too fast, it may crack. You can also try a thinner coating. Adding a little oil to the melted chocolate helps it stay smooth.
Can I make these cheesecake bites ahead of time?
Yes, you can make these bites a day or two ahead. Just keep them in the fridge. For longer storage, freeze them. Ensure they are in an airtight container. Thaw them in the fridge before serving. This way, they stay fresh and tasty.
What can I serve with chocolate-covered cheesecake bites?
These bites pair well with fresh fruits like strawberries or raspberries. Coffee complements the chocolate flavor nicely. You can also serve them with dessert wines, enhancing the sweet taste. For a fun twist, try them with a scoop of vanilla ice cream!
These chocolate-covered cheesecake bites are fun to make and delicious to eat. You learned how to prepare a creamy base, freeze your bites, and coat them in chocolate. I shared tips for perfect texture and fun variations for flavor and health. Remember, you can customize these treats to fit any occasion. Enjoy making them for friends and family, or just for yourself. Happy snackin