
Welcome to a world of flavor with these Orange Glazed Cranberry Scones! If you crave a treat that’s tasty and simple, you’re in the right place. I’ll guide you through easy steps to create these delightful scones right at home. With vibrant orange and tart cranberry, each bite bursts with joy. Ready to bake? Let’s dive into the ingredients and start making your new favorite snack!
Why I Love This Recipe
- Delicious Flavor Combination: The sweet and tart balance of cranberries with the citrusy brightness of orange creates a delightful flavor explosion in every bite.
- Easy to Make: This scone recipe requires minimal ingredients and can be whipped up in no time, making it perfect for a quick breakfast or snack.
- Perfectly Flaky Texture: With the right technique in handling the dough, these scones turn out beautifully flaky and tender, making them irresistible.
- Customizable: You can easily adapt this recipe by adding your favorite mix-ins, such as chocolate chips or nuts, to make it uniquely yours.
Ingredients
List of Required Ingredients
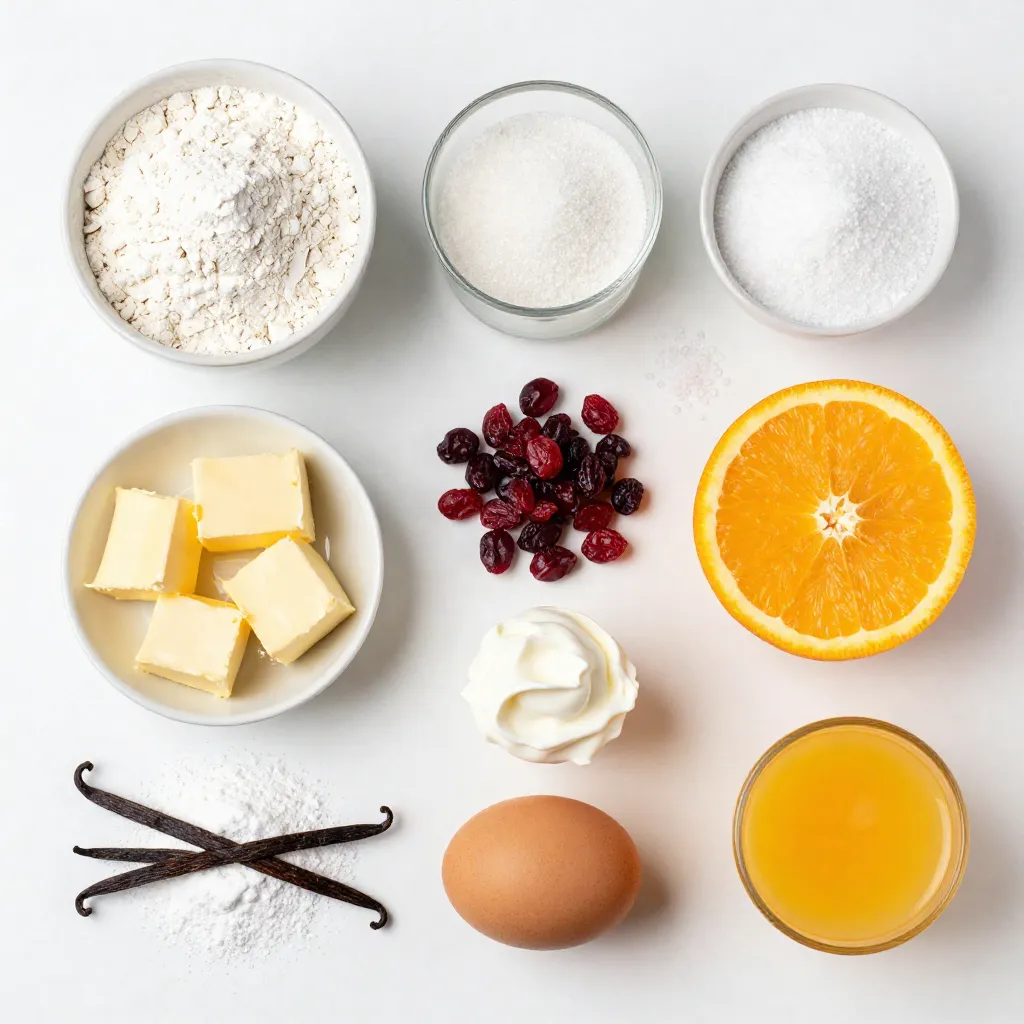
To make these tasty orange glazed cranberry scones, gather these ingredients:
– 2 cups all-purpose flour
– 1/3 cup granulated sugar
– 1 tablespoon baking powder
– 1/2 teaspoon salt
– 1/2 cup unsalted butter, cold and cubed
– 1/2 cup dried cranberries
– Zest of 1 orange
– 1/2 cup heavy cream
– 1 large egg
– 1 teaspoon vanilla extract
– 1/2 cup powdered sugar (for glazing)
– 2 tablespoons fresh orange juice (for glazing)
Ingredient Substitutions
You may find you need a few swaps for this recipe. Here are some ideas:
– Use whole wheat flour for a heartier texture.
– Swap granulated sugar with brown sugar for a deeper flavor.
– If you lack heavy cream, use milk mixed with a bit of butter.
– For a dairy-free option, try coconut cream.
Optional Add-ins
Want to make your scones even more special? Consider these add-ins:
– Add nuts like walnuts or pecans for crunch.
– Include white chocolate chips for a sweet twist.
– Mix in fresh orange segments for extra fruitiness.
– Use different dried fruits, like blueberries or cherries, for variety.
Step-by-Step Instructions
Preparation Steps
1. Start by preheating your oven to 400°F (200°C). Line a baking sheet with parchment paper. This helps the scones not stick.
2. In a large bowl, mix 2 cups of flour, 1/3 cup of sugar, 1 tablespoon of baking powder, and 1/2 teaspoon of salt. Whisk them together well.
3. Add 1/2 cup of cold, cubed butter to the flour mix. Use a pastry cutter or your fingers to blend. You want it to look like coarse crumbs.
4. Fold in 1/2 cup of dried cranberries and the zest of 1 orange. Ensure these are mixed evenly throughout.
Baking Instructions
5. In a different bowl, whisk together 1/2 cup of heavy cream, 1 large egg, and 1 teaspoon of vanilla extract. Mix until well combined.
6. Pour the wet mixture into the dry ingredients. Gently mix until just combined. You should still see some flour.
7. Move the dough to a floured surface. Pat it into a round disk about 1 inch thick. Cut it into 8 wedges and place them on the baking sheet.
8. Bake for 15-20 minutes. They should turn lightly golden on top. Once done, remove them and let them cool on a wire rack.
Glazing Process
9. While cooling, make the glaze. In a small bowl, mix 1/2 cup of powdered sugar with 2 tablespoons of fresh orange juice. Stir until smooth.
10. Drizzle the orange glaze over the cooled scones. Let it set for a few minutes before serving. Enjoy your tasty treat!
Tips & Tricks
Achieving the Perfect Texture
To get soft and flaky scones, handle the dough gently. Overmixing can make them tough. Mix until you still see some flour. Use cold butter to keep the dough light and airy. When you cut the scones, do not twist the knife. This helps them rise nicely in the oven.
Storing Your Scones
Store your scones in an airtight container at room temperature. They stay fresh for about two days. If you want them to last longer, freeze them. Wrap each scone in plastic wrap and place them in a freezer bag. They can stay in the freezer for up to three months.
Serving Suggestions
Serve your Orange Glazed Cranberry Scones warm or at room temperature. Pair them with a cup of tea or coffee for a lovely treat. You can also add butter or cream cheese for extra flavor. For a fun twist, serve them with fresh fruit or a dollop of jam. Enjoy these delights for breakfast or as a snack!
Pro Tips
- Use Cold Butter: Make sure your butter is very cold; this helps create a flaky texture in the scones.
- Don’t Overmix: Mix the wet and dry ingredients until just combined to ensure your scones remain tender.
- Pat, Don’t Roll: Pat the dough into shape rather than rolling it out to maintain the integrity of the butter chunks.
- Glaze While Fresh: Drizzle the glaze on the scones while they are still warm for better adherence and flavor absorption.
Variations
Adding Different Fruits
You can switch up the dried cranberries for other fruits. Try dried cherries, blueberries, or even raisins. Each fruit brings its own sweet flavor. I love how cherries add a tart punch. If you go with blueberries, they add a lovely color. Just make sure to chop larger fruits into smaller pieces. This helps them mix well into the dough.
Gluten-Free Options
Making these scones gluten-free is easy! Use a gluten-free all-purpose flour blend instead of regular flour. Look for a blend that has xanthan gum. This helps the scones rise and stay together. You can also mix in almond flour for a nutty flavor. Just keep the same amount of liquid to get the right texture.
Flavor Enhancements
Want to jazz up your scones? Add spices like cinnamon or nutmeg. A little zest from lemon or lime can brighten the flavor too. You can also fold in some chopped nuts. Walnuts or pecans add a nice crunch. If you enjoy a sweeter treat, add chocolate chips for a fun twist. Each of these options lets you create a new favorite!
Storage Info
How to Store Scones Properly
To keep your Orange Glazed Cranberry Scones fresh, place them in an airtight container. This method keeps the scones soft. Store them at room temperature for up to three days. If you want to keep them longer, consider freezing.
Freezing Instructions
You can freeze scones to enjoy later. First, let them cool completely. Once cool, wrap each scone in plastic wrap. Then, put the wrapped scones in a freezer bag. They can last in the freezer for up to three months. When you’re ready to eat them, just thaw them overnight in the fridge.
Reheating Tips
To reheat your scones, preheat the oven to 350°F (175°C). Place the scones on a baking sheet. Heat them for about 5-10 minutes. This warms them up and revives their texture. You can also microwave them for about 20-30 seconds, but the oven gives a better result. Enjoy your scones warm!
FAQs
Can I make these scones ahead of time?
Yes, you can make these scones ahead of time. Prepare the dough and cut the scones. Place them on a baking sheet and cover with plastic wrap. You can refrigerate them for up to 24 hours. When you’re ready to bake, just pop them in the oven. This saves time and makes mornings easy.
How do I keep scones from drying out?
To keep scones moist, avoid overbaking them. Bake until they are just golden. Once baked, let them cool on a wire rack. Store them in an airtight container at room temperature. If you have leftover scones, wrap them in foil to keep them fresh. You can also reheat them with a little butter for extra moisture.
What can I serve with Orange Glazed Cranberry Scones?
Serve these scones with a variety of spreads. Cream cheese or butter pairs well. You can also add jam for extra flavor. A nice cup of tea or coffee enhances the experience. For a twist, try serving with lemon curd or clotted cream. These options make your scone treat even more delightful.
This blog post walked you through making delicious scones from start to finish. We covered key ingredients and helpful swaps for your needs. The step-by-step guide ensured you follow along easily. Tips on texture and storage extend the life of your baked goods. With flavor variations and storage options, your scones will stay fresh and tasty.
Now, go enjoy making these scones and sharing them with friend